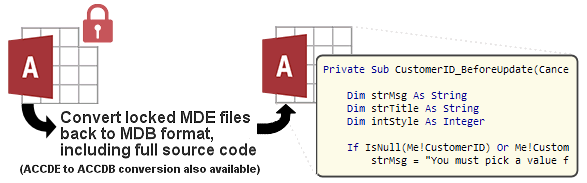
IN THE SPOTLIGHT: MDE to MDB Conversion Service
(also supports: ACCDE to ACCDB, ADE to ADP, etc)
IN THE SPOTLIGHT: Access Database Repair Service
An in-depth repair service for corrupt Microsoft Access files

IN THE SPOTLIGHT: vbWatchdog
VBA error handling just got easier...

" vbWatchdog is off the chart. It solves a long standing problem of how to consolidate error handling into one global location and avoid repetitious code within applications. "
- Joe Anderson,
Microsoft Access MVP
Meet Shady, the vbWatchdog mascot watching over your VBA code →
(courtesy of Crystal Long, Microsoft Access MVP)
IN THE SPOTLIGHT: vbMAPI
An Outlook / MAPI code library for VBA, .NET and C# projects
Get emails out to your customers reliably, and without hassle, every single time.

Use vbMAPI alongside Microsoft Outlook to add professional emailing capabilities to your projects.
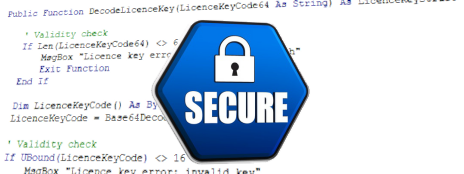
IN THE SPOTLIGHT: Code Protector
Standard compilation to MDE/ACCDE format is flawed and reversible.
Microsoft Access is a relational database and in order to take advantage of the full suite of functions it has to offer it is vital that you learn the use of relationships. Without these relationships, your Access database will simply remain several independent and unlinked tables. Relationships help rebuild these tables so that all the data is, in some way, linked. Often when you set up queries or if you use the lookup wizard when designing a table some of the relationships will automatically be created but there will more than likely come a time when you need to manually create relationships.
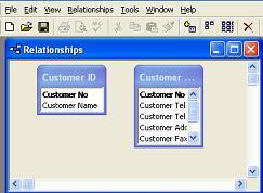
View your tables.Once you’ve set up the required tables, click the relationship button and you will be presented with a screen similar to this one. This shows all of the tables you have created in your database and all of the fields in each table. If you have set a primary key on any field it will appear in bold (Customer No in both tables are set as the primary key in this example). |
|
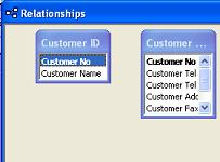
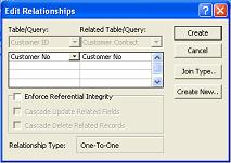
Creating the first relationship.In this instance, we would want to create a relationship between the two fields called Customer No. In order to do this, simply drag the field Customer No from the parent table to the child table. In this instance the parent table is Customer ID because all information in the other table pertains to that one. Once you’ve done this the ‘Edit Relationships’ dialog will pop up. You will notice near the bottom of the screen there are two options that are grayed out. In order to use either of these you must tick the box next to ‘Enforce Referential Integrity’. Cascade Update Related Fields means when you change a primary key value in the Parent Table the value will be changed in all related records. Cascade Delete Related Records means when you delete a record in the Primary Table, all associated records will also be deleted. |
|
Join TypeThere are 3 different types of join in an Access database and the one you need to select will depend entirely on your requirements. If the relationship is set up automatically for you then the correct relationship should be selected, and unless you have numerous different relationships set up it is unlikely that you will need to change this from selection 1, certainly not until you have more experience of working with the relational side of Microsoft Access. As you can see creating relationships within Microsoft Access really is quite a simple procedure, knowing when to use them is the more difficult part. This is especially true if you’ve been using a spreadsheet that has simply grown too large and is also true if you want to use sub tables, sub forms or sub queries. Without the use of queries you are seriously limiting your database capabilities. Setting up queries that involve anything more than one table will involve the creation of relationships. In most databases that utilize more than two tables you will undoubtedly have many relationships set up of many different types and if you do use sub queries or lookups then you will need even more relationships. It is important that you get to grips with basic relationships and how to create them. The best way to learn is to set up a small sample database of your own and give it a go. Initially try just using two or maybe three tables and then add more tables as you progress. Eventually you will know virtually everything there is to know about the relational database. |
|
Rate this article: 
TWINBASIC LTD (Company No. 16590181, VAT No. GB497509439)
Terms | Privacy | Sitemap | X (Twitter)

