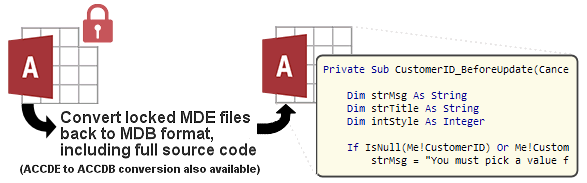
IN THE SPOTLIGHT: MDE to MDB Conversion Service
(also supports: ACCDE to ACCDB, ADE to ADP, etc)
IN THE SPOTLIGHT: Access Database Repair Service
An in-depth repair service for corrupt Microsoft Access files

IN THE SPOTLIGHT: vbWatchdog
VBA error handling just got easier...

" vbWatchdog is off the chart. It solves a long standing problem of how to consolidate error handling into one global location and avoid repetitious code within applications. "
- Joe Anderson,
Microsoft Access MVP
Meet Shady, the vbWatchdog mascot watching over your VBA code →
(courtesy of Crystal Long, Microsoft Access MVP)
IN THE SPOTLIGHT: vbMAPI
An Outlook / MAPI code library for VBA, .NET and C# projects
Get emails out to your customers reliably, and without hassle, every single time.

Use vbMAPI alongside Microsoft Outlook to add professional emailing capabilities to your projects.
IN THE SPOTLIGHT: Code Protector
Standard compilation to MDE/ACCDE format is flawed and reversible.

Provided by Allen Browne. Created September 2004. Last updated: April 2010.
You can design a report to use one of your printers by choosing Page Setup from the Page Setup ribbon (Access 2010), the Report Tools ribbon (Access 2007), or the File menu (previous versions.) But that approach is useless if others use your report: you do not know what printers they will have installed.
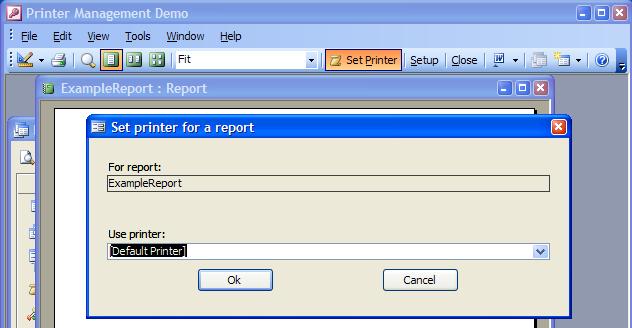
This utility lets the end user assign one of their printers to each report. Whenever they open the report, it is sent to that printer. The utility works with MDE files and runtime versions also.
The utility also illustrates how to manipulate the Printer object and the Printers collection introduced in Access 2002.
Click to download the utility (30KB, Access 2002/3 mdb format, zipped). You can also view the code from this utility.
The utility has a function named OpenTheReport() to use instead of DoCmd.OpenReport. The function checks to see if the user has assigned a particular printer for the report, and assigns the Printer before the report opens.
To assign a printer, all the user has to do is preview the report, and click the custom Set Printer toolbar button. The utility remembers the choice, and uses that printer for that report in future.
The utility works only with Access 2002 and later. Albert Kallal has one for earlier versions: Access 97 or Access 2000.
The utility does not let the user choose paper sizes. That can be done by opening the report in design view, and manipulating PrtMip. (Does not work for MDE.)
To use the correct printer, you must use the supplied function, OpenTheReport(). Docmd.OpenReport works if the report is previewed, but not if it is opened straight to print. Opening reports with the New keyword (for multiple instances) is not supported.
If you open several reports directly to print at once, the timing of the assignment of the Printer object may not operate correctly. To avoid this, program a delay between printing the reports, and include DoEvents.
To import the components of this utility into your database:
The other form (frmSwitchboardExample) and the reports are included purely for demonstration purposes.
To prepare your report to use this utility, open it in design view, and set these properties of the Report:
| On Close | =SetupPrinter4Report() | |
| On Activate | =SetupPrinter4Report([Report].[Name]) | |
| On Deactivate | =SetupPrinter4Report() | |
| Toolbar | ReportToolbar |
If you will use this with most of your reports, you may wish to set up a default report.
In Access 2002, you must also include a reference to the Microsoft DAO 3.6 Library, by choosing References on the Tools menu from a code window. More information on references.
OpenTheReport() is the only function you need to learn. It is similar to the OpenReport method built into Access, but has several enhancements.
Firstly, it looks to see if you have specified a printer to use for the report, and assigns it before opening the report. (If you use the old OpenReport to print directly (no preview), it will not use the desired printer.)
Secondly, this function defaults to preview instead of printing directly.
Thirdly, it avoids the problem where the report is not filtered correctly if it is already open.
Fourthly, it does away with the FilterName argument that is rarely used, confusing, and inconsistent. Instead, it provides a simple way to pass a description of the filter to display on the report. Without an explanation of the filter, the printed report is meaningless, and printing the filter itself on the report may be too cryptic. You can therefore enter a description string. It is passed to the report through its OpenArgs. To display the description on the report, just add a text box with Control Source of: =[Report].[OpenArgs]
Fifthly, it avoids the need to trap Error 2501 in every procedure where you open a report. OpenTheReport() traps and discards this annoying error message that can come from the report's NoData event, an impatient user, or some other problem. If you need to know whether the report opened, check the return value of the function. It will be True on success, or False if the report did not open.
| Code | Explanation |
| Call OpenTheReport("Report1") | Open Report1 in preview. |
| Call OpenTheReport("Report2", acViewNormal, _ "ClientID = 5", "Barney's orders only.") |
Send Report2 to the printer, filtered to client 5, with a description to print on the report. |
| If Not OpenTheReport("Report5") Then MsgBox "Report did not open." End If |
Show a message if the report was cancelled. |
OpenTheReport() takes these arguments:
Note that strDoc, strWhere, and strDescrip are strings - not variants.
When you assign a printer for a report, the utility creates a new property named Printer2Use. The property is type
dbText, and stores the name of the user's printer. The property is created on the report document:
CurrentDb().Containers("Reports").Documents("MyReport")
since that property can be written and read without opening the report itself. The property is deleted if the user returns the report to the default printer. One advantage of using the custom property over a lookup table is that the assigned printer remains with the report even if the report is renamed, or duplicated.
It turns out that you cannot merely set the Printer object in the Open event of the report. That works if the report is previewed, but not if it is sent straight to print. This is the reason the report must be opened through the function that sets the printer before the report is opened.
The Printer setting is application-wide. If you have several reports open in preview at once, and switch between them, the utility needs to assign the correct printer to each one. The Activate and Deactivate events of the report achieve that.
To restore the Printer object, to the Windows default, use:
Set Application.Printer = Nothing.
That destroys the object. Access then reconstructs it - from the default Windows printer.
View the code if you wish.
| Home | Index of tips | Top |
Rate this article: 
This is a cached tutorial, reproduced with permission.
TWINBASIC LTD (Company No. 16590181, VAT No. GB497509439)
Terms | Privacy | Sitemap | X (Twitter)


